Last winter we introduced Big Slugger with a few videos documenting an indoor cycle of Blue Dream. Slugger wasn’t particularly happy with the results of the cycle and asked us for an opportunity to redeem himself. Big Slugger is primarily an outdoor grower, and he’s damn good one at that. We figured we would give him another shot at impressing us.
So here we are, back in a northern California medicinal marijuana garden to document Big Sluggers greenhouse/outdoor grow. Slugger is trying his luck again with Blue Dream. These plants are clones that were started from the same stock that he used for his indoor. So far we have made two trips to his estate, the following video has been compiled from footage filmed during both visits.
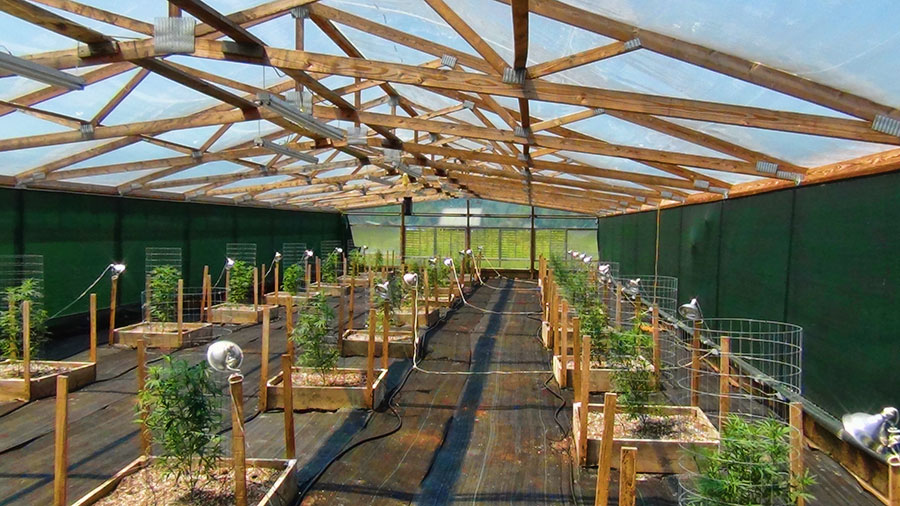
Big Slugger has been using this large greenhouse for several years. In an effort to perfect this structure Slugger has been gradually upgrading. This year he added a weed barrier ground cloth, and an improved drip system.
 Ground Cover

Before Slugger rolled out this black weed barrier he mowed and raked the grass that had grown over the winter. After applying an herbicide to the grass, he dusted heavily with sulfur and diatomaceous earth. These steps are an effort to suppress any fungus or insect colonies that might decide to take up residence under the ground cloth. Finally, he laid the ground cloth and secured it with ground staples. The smooth floor and th absence of grass should improve airflow. Additionally, with no grass or weeds the only evapotranspiration taking place in the greenhouse will be from the cannabis. He hopes this will help with late fall humidity that has caused botrytis problems in the past.
Superstructure
Big Sluggers greenhouse is built a bit like a fence. It’s walls are 10 foot pressure treated 4â€x4â€s that have been buried in concrete 2 feet into the ground. Pressure treated 4â€x4â€s span the distance between these posts and are connected at their intersections by Simpson ties. The roof portion of the greenhouse was assembled using 14 prefabricated scissor trusses that are 40 feet in length and feature a 3:12 pitch. The trusses were then tied into place with 2â€x4â€s and 2â€x6â€s that span the length of the greenhouse. In addition to creating a sturdy roof these boards provide a scaffold or catwalk that allows better access to the upper portion.
Skin
The superstructure is skinned using two types of material. The walls are made from 90% shade cloth that is marketed as privacy screen. These walls are meant to be a visual barrier and not intended to allow much light to penetrate into the garden. The planting areas is arranged so that there is only shadows cast onto the plants in the very early morning and late evening. By using this material, some air exchange is permitted while wind blown rain is kept out.
A high quality 6mm greenhouse film is used over the trusses to allow light to enter the garden. The film is anchored to the trusses at its ends using a unique film lock system. This system uses aluminum channel and stainless steel “springs†that grasp the film very securely. A wonderful feature of this film lock system is that the plastic can be secured, taken down and re-secured several times without destroying the film. Because the privacy cloth is on the inward side the structures walls, Slugger can also secure greenhouse film to the exterior of the side walls if he desires the heating potential of a complete greenhouse.
This part of California gets quite hot in the summer. Big Sluggers always roles up the film and secures it with HVAC ducting zip ties after the spring storms have passed. Later in the year as the first fall storms begin to threaten, he unrolls his roof and secures the ends and lower edge to to keep his plants dry. He leaves the film on the trusses throughout the winter to keep the holes from flooding and to keep his electrical fixtures in working order.
Planting Areas
The 2â€x12†wood planting boxes are just the tip of the iceberg. Beneath these 4’x4’ boxes are monstrous holes, each containing approximately 1.75 cubic yards of soil. These holes have been lined with ½†galvanized wire mesh to keep out gophers, and are filled with a combination of bulk planting mix and bag soil. Big Slugger likes to do a bit of poop smithing and normally prepares his own planting mixes. Slugger likes fast draining mixes and tends to use loads of perlite and partially composted redwood chips.
Electrical
One of our favorite features in Big Sluggers greenhouse is its electrical system. Big Slugger shopped around until he found the RIGHT electrical contractor, who wired a 100 amp 240 volt service to the structure. This is the size of many house services! With this many amps Big Slugger is able run just about any piece of equipment he needs. To make full use of his electrical service, Slugger installed 8 GFCI protected outlets in weatherproof boxes down each side of the greenhouse. He uses these outlets to either run supplemental lighting, soil warming cables, security features and various other equipment.
When the roof is on in early spring and later fall, Slugger uses four thermostatically controlled blowers drawing 60,000 cubic feet per minute to help regulate the temperature and humidity. These blowers feature automated shutters that open when the fans are on, and close when the fans are off. Across the garden he has installed several shuttered flap assemblies that serve as intakes when the fans are in operation.
Irrigation
To keep things watered, Big Slugger has installed a semi-automatic fertigation system. At the heart of this system lives a pair of Dosatrons. By using two of these amazing devices slugger is able to meter two part nutrient solutions simultaneously. The fertilizer injectors are mounted with a valve manifold that permits the use of one, both or a full bypass of the dosatrons. The mixed solution is then delivered to Sluggers garden via ¾†main line coupled with ⅛†6.6 gallon per hour spray stakes.
Plants
After an indoor cycle, Big Slugger decided he liked the Blue Dream strain, so he kept it going by taking a few clones. His cuttings were rooted sometime in March, and lived indoors, under 1000 watt high pressure sodiums until recently. Slugger vegetated his plants in 10 gallon cans filled with Royal Gold Basement mix, which is coir based. While indoors, Big Slugger fed the plants with Advanced Nutrients Sensi grow and humic and fulvic acid. They grew faster than predicted and Slugger was happy when the weather became fair enough to plant them in the greenhouse.
Supplemental light
Most clones that have been started indoors can’t be planted outside until the days become long enough to keep them vegetating. Most strains seem to do well when planted outdoors on or around May 15. On this date there is about 14.5 hours of sunlight at Sluggers latitude. Big Slugger knows this, but prefers to put his clones out much earlier.
To keep his clones vegetating Big Slugger uses artificial lighting to increase the days length. The greenhouse has two options to supplemental lighting; Individual clamp base lamps plugged into the outlets, or rows of eight foot T10 shop light fixtures that are hard wired and hang from the trusses. Both lighting systems have been wired into heavy duty timers to automate the lights. With these lights Slugger is able to manipulate photoperiod and keep his clones vegetating.
This is yet another northern California medicinal cannabis garden that we will be watching this summer. We will be posting more about this garden’s progress on regular intervals, so keep an eye out for updates!
Grow Like a Pro – Big Sluggers Outdoor Cannabis Garden,


hey guys,
i stumbled upon this website while researching greenhouse designs…. Fantastic!!! beautiful greenhouse and great article, i’ll be adding this site to my favourites…. keep up the good work
Squid,
Thanks for the feedback. Sluggers greenhouse was designed to suit his needs. If you’re designing a greenhouse we would love to get involved. Consider opening a thread on the forum where we can toss some ideas around.
Are the sprayers gravity fed? Or by pump and if so what kind of pump? I can’t figure it out!!!! Plz help!!!
The water at this property is fed by a well so the pressure tank creates the water pressure.
Excellent post! We are linking to this particularly great article on
our website. Keep up the good writing.
We are happy to hear you like our page. Thanks for the link.
Ball park overall cost
No idea. $10,000?
Is the final update up yet? If not, when? Thanks!!! Toodaloo
Great post.
I just like the valuable information you supply in your articles.
I’ll bookmark your blog and test onche more right here frequently.
I am quite certain I’ll be told lots of new stuff proper right here!
Good luck for the following!
Greetings! Quick question that’s completely off topic.
Do you know how to make your site mobile friendly? My website
looks weird when viewing from my apple iphone. I’m trying to find a
theme or plugin that might be able to fix this problem.
If you have any suggestions, please share. Thanks!
Wonderful, what a webhsite it is! This webpage gives useful
facts to us, keep it up.
Did he use a Crane to hang those 40′ Trusses ??